Upload to Google Cloud Storage Progress Bar
Quickstart: Using the Panel
Acquire how to get started with Cloud Storage using the Google Deject Panel.
Costs that you lot incur in Cloud Storage are based on the resources you use. This quickstart typically uses less than $0.01 USD worth of Cloud Storage resources.
For an interactive walkthrough like to these tasks in Cloud Console, click Guide me:
Guide me
Before you brainstorm
- Sign in to your Google Cloud account. If you're new to Google Cloud, create an account to evaluate how our products perform in real-world scenarios. New customers besides get $300 in free credits to run, test, and deploy workloads.
-
In the Google Cloud Panel, on the project selector page, select or create a Google Cloud project.
Go to project selector
-
Make sure that billing is enabled for your Cloud projection. Learn how to check if billing is enabled on a project.
-
In the Google Cloud Console, on the project selector page, select or create a Google Cloud projection.
Get to project selector
-
Make sure that billing is enabled for your Cloud project. Acquire how to cheque if billing is enabled on a project.
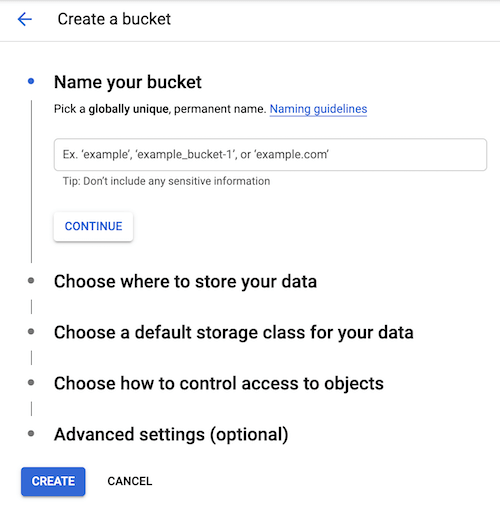
Create a bucket
Buckets are the bones containers that hold your data in Cloud Storage.
To create a bucket:
- In the Google Deject Panel, go to the Deject Storage Browser page.
Go to Browser
-
Click Create bucket to open up the saucepan creation form.
-
Enter your saucepan information and click Continue to consummate each pace:
-
Enter a unique Name for your bucket.
-
Do not include sensitive information in the bucket proper name, because the bucket namespace is global and publicly visible.
-
-
Cull Region for Location type and us-east1 (Due south Carolina) for Location.
-
Choose Standard for default storage class.
-
Choose Uniform for Access command.
-
Choose None for Protection tools.
-
-
Click Create.
That'due south it — you've just created a Deject Storage bucket!
Upload an object into the bucket

To upload the image above into your new saucepan:
-
Right-click on the image above and download it to your computer.
-
In the Cloud Storage browser page, click the name of the bucket that you created.
-
In the Objects tab, click Upload files.
-
In the file dialog, become to the file that you downloaded and select it.
After the upload completes, you should see the file proper noun and information near the file, such equally its size and type.
Download the object
To download the prototype from your bucket, click Download .
To let public access to the bucket and create a publicly accessible URL for the epitome:
-
Click the Permissions tab above the list of files.
-
Ensure the view is set to Principals. Click Add.
The Add principals pane appears.
-
In the New principals box, enter
allUsers. -
In the Select a office drop-downward, select Cloud Storage > Storage Object Viewer.
-
Click Salvage.
-
In the Are you sure you lot desire to make this resources public? window, click Allow public access.
To verify, click the Objects tab to render to the list of objects. Your object's Public access column should read Public to internet. The Copy URL push button provides a shareable URL similar to the following:
https://storage.googleapis.com/YOUR_BUCKET_NAME/kitten.png
To remove public access from the saucepan and stop sharing the image publicly:
-
Click the Permissions tab higher up the listing of objects.
-
Discover the entry that has allUsers listed in the Principals cavalcade. Select the checkbox for that entry.
-
Click Remove.
-
In the Delete allUsers window, click Confirm.
In the Objects tab, you lot should see that the image no longer has a Copy URL button associated with it.
Create folders
-
In the Objects tab, click Create folder.
-
Enter folder1 for Name and click Create.
You lot should see the folder in the bucket with an paradigm of a folder icon to distinguish it from objects.
Create a subfolder and upload a file to information technology:
-
Click folder1.
-
Click Create folder.
-
Enter folder2 for Proper name and click Create.
-
Click folder2.
-
Click Upload files.
-
In the file dialog, navigate to the screenshot that you lot downloaded and select it.
Afterwards the upload completes, you should see the file proper noun and information about the file, such as its size and type.
Delete the objects
-
Click the arrow next to Bucket details to return to the buckets level.
-
Select the bucket.
-
Select the checkbox next to folder1.
-
Click on the Delete button.
-
In the window that opens, enter the folder name you want to delete.
-
Click Delete to permanently delete the folder and all objects and subfolders in it.
Clean up
To avert incurring charges to your Google Cloud account for the resources used on this page, follow these steps.
- Open the Cloud Storage browser in the Google Cloud Panel.
Open the Cloud Storage browser - Select the checkbox next to the bucket that you created.
- Click Delete.
- In the window that opens, confirm yous want to delete the bucket.
- Click Delete.
What'southward next
- Work through the Cloud Storage Quickstart using the gsutil tool.
- Review the available guides for completing tasks in Cloud Storage.
- Larn well-nigh storage classes.
- Acquire virtually Cloud Storage pricing.
- Go started with the Cloud Storage client libraries.
campbelllationd1950.blogspot.com
Source: https://cloud.google.com/storage/docs/quickstart-console
0 Response to "Upload to Google Cloud Storage Progress Bar"
Post a Comment